奶牛一直以为自己的服务器都开了OPcache,但是后来发现只是编译了,但是没有启用,今天启用了PHP7的OPcache,来发一份儿体验报告。
配置OPcache
配置文件为/usr/local/php/etc/php.ini,添加内容
[zend opcache]
zend_extension="/usr/local/php/lib/php/extensions/no-debug-non-zts-20170718/opcache.so"
opcache.force_restart_timeout=3600
opcache.memory_consumption=128
opcache.interned_strings_buffer=8
opcache.max_accelerated_files=4000
opcache.revalidate_freq=60
opcache.fast_shutdown=1
opcache.enable=1
opcache.enable_cli=1
其中的zend_extension为你服务器编译后opcache.so文件的位置。
OPcache性能测试
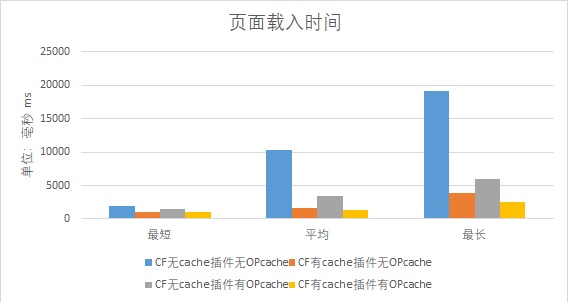
载入时间数据比较:
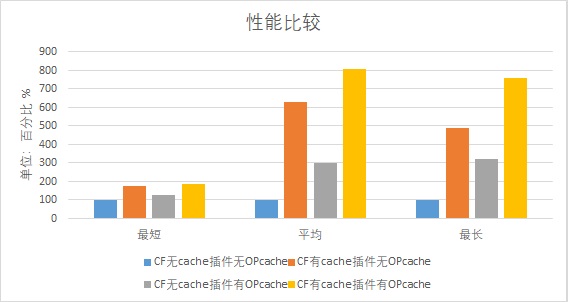
性能比较:
测试结论
经过奶牛的测试,在服务器未启用WordPress cache插件的时候,CPU的飙升是非常厉害的,严重影响服务器性能,因此无WordPress插件的情况下,并未完全遵从1000次测试,但是图表已经完全可以说明性能的比较了。
WordPress的cache插件对网站性能提升至关重要,OPcache的存在也能最大性能的提升WordPress服务器的性能,对比而言,OPcache可以提升PHP7约3倍的性能,WordPress的cache插件可以提升约4~5倍的性能,WordPress启用cache插件并且在PHP7下启用OPcache,性能提升8倍。
所以,奶牛强烈建议WordPress的用户使用PHP7并开启OPcache,并且为WordPress安装一款cache插件,保证服务器的性能最优。